# Introduction
Shiki is a novel syntax highlighter that uses TextMate grammar and Visual Studio Code’s Oniguruma library to tokenize and highlight source code. Where it differs, compared to other syntax highlighters like Pygments (written in Python), Rouge (written in Ruby), and highlight.js (written in JavaScript) are its customization abilities: namely themes (including Visual Studio Code themes), language support (spoken/multi-byte languages AND syntactical/programming languages 😉), and its ability to use custom renderers (i.e. render to PDF should you ever want to do that). It is a Node.js library so integrating it with Ruby-based Jekyll is not typical and requires a some custom code. Unfortunately, this probably won’t work on Github Pages because of their custom plugin restrictions.
If you have a Jekyll-based site and use Github Pages, I highly recommend checking out Cloudflare’s Pages service or Netlify which have far fewer restrictions. More on that topic at another time. 🤓
In this guide, we will be creating a Ruby plugin for Jekyll which will allow us to use the {% shiki %} Liquid tag to trigger a node.js process to execute when the Jekyll site is built. Through a JavaScript file, we will import the Shiki library, and through stdin/stdout we’ll input the specified source code that needs formatting, and Shiki will respond with the color-formatted HTML, in the form oftags with embedded style attributes. No more relying on an external JavaScript and/or CSS file which visitors will need to first load to see the highlighted code.
In a later part (part 2) of this post, I will demonstrate how to further enhance this process to allow for more advanced usage: such as custom themes (including your favorite Visual Studio Code themes), specific line highlights based on line number, and further customizations that you can do leveraging your site’s own HTML/CSS framework to create a formal header (file name with icon, for example) and the ability to copy the source code to the clipboard without manually selecting the code first, and of course, displaying line numbers.
# Comparison between highlighters (VS Code vs Shiki vs highlight.js vs Rouge vs Prism)
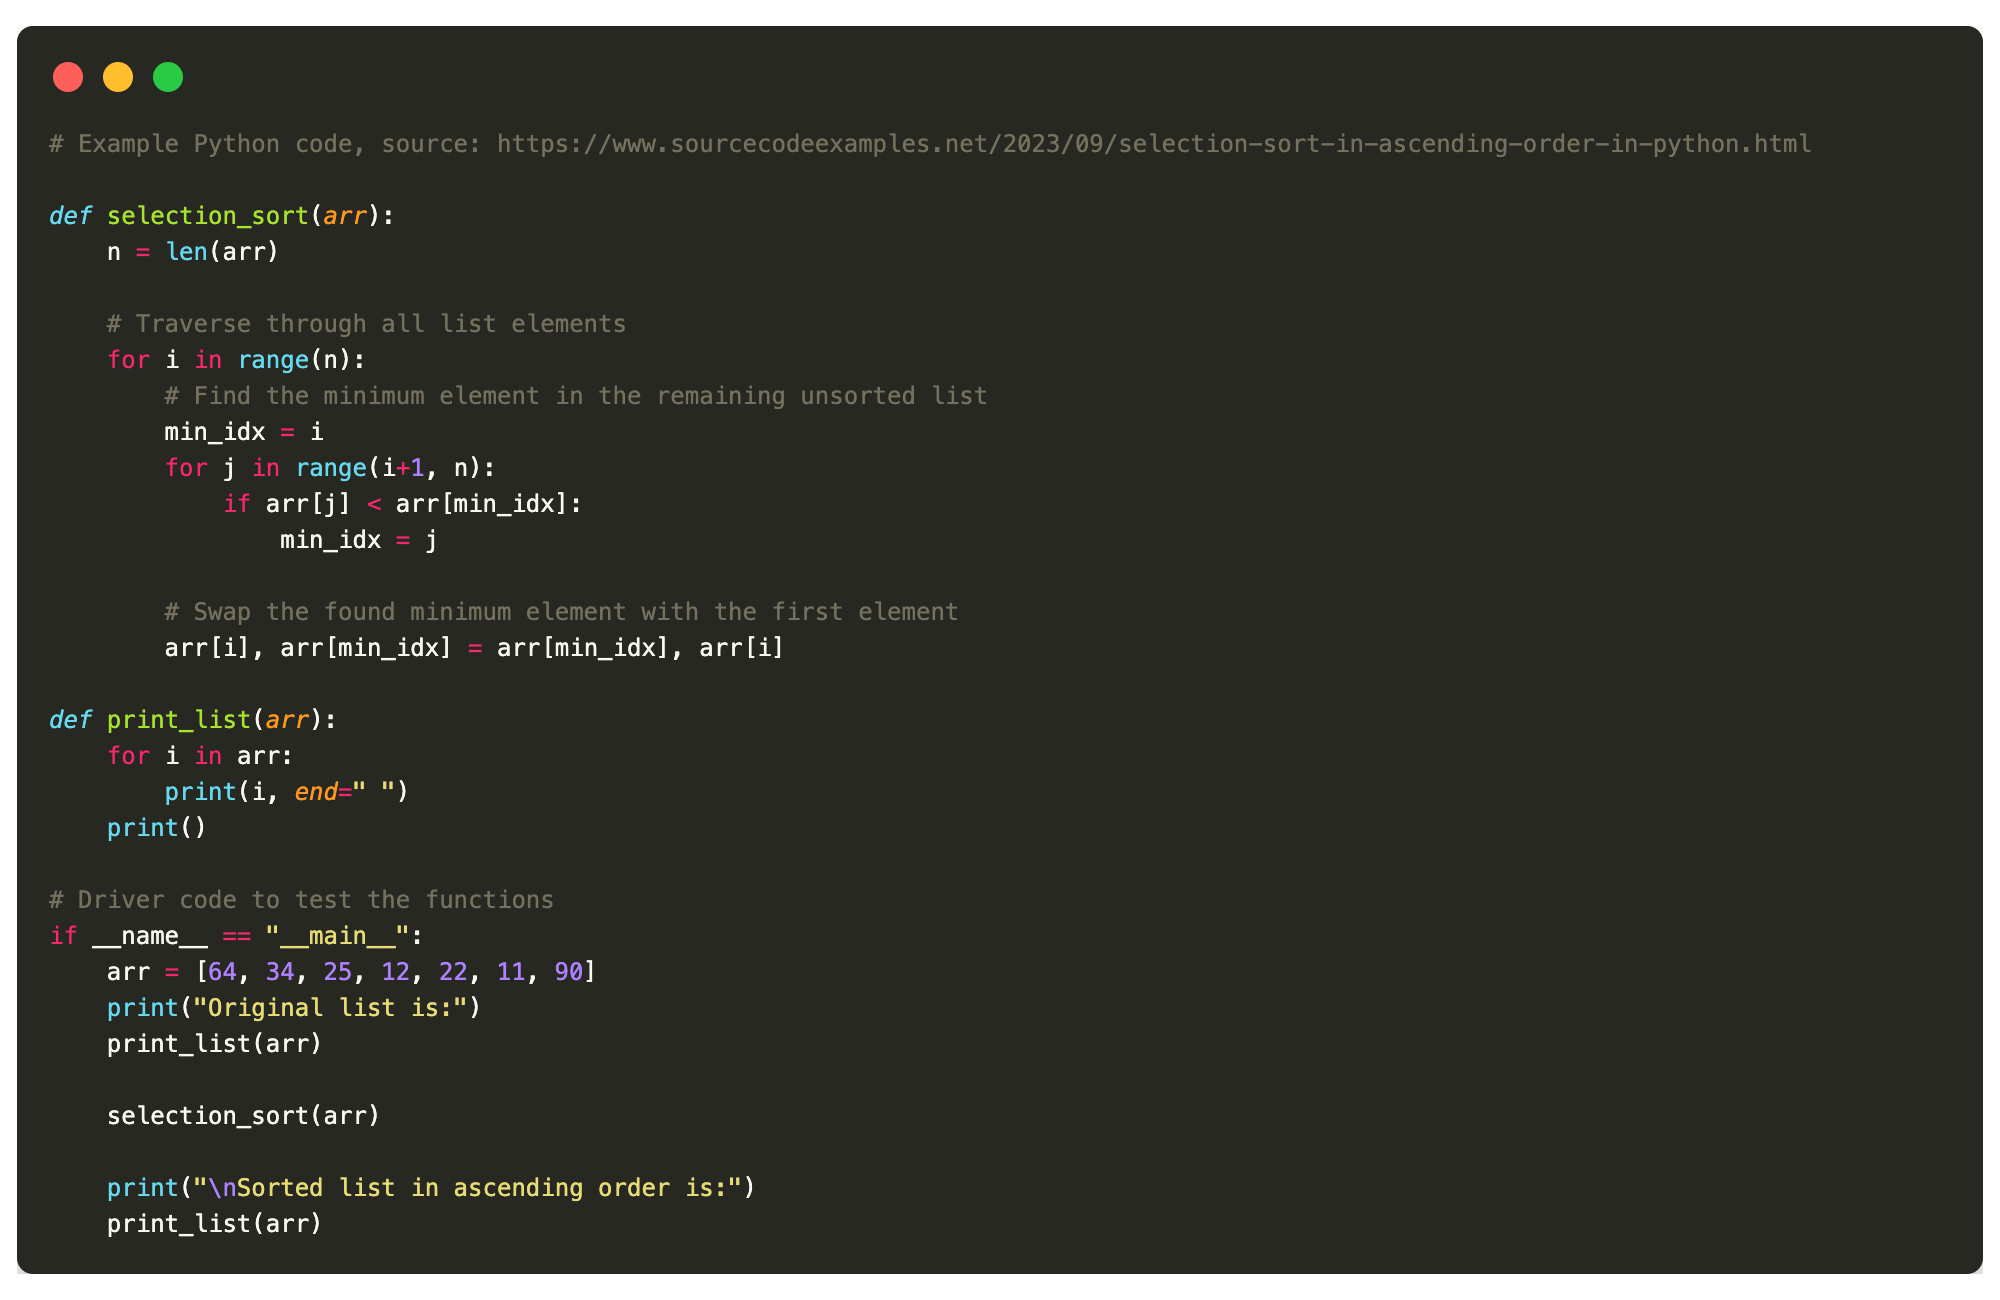
Here we are comparing against Visual Studio Code’s syntax highlighting engine as a control for this experiment, which has the “Monokai” theme loaded.

# Example Python code, source: https://www.sourcecodeexamples.net/2023/09/selection-sort-in-ascending-order-in-python.html

def selection_sort(arr):
    n = len(arr)

    # Traverse through all list elements
    for i in range(n):
        # Find the minimum element in the remaining unsorted list
        min_idx = i
        for j in range(i+1, n):
            if arr[j] < arr[min_idx]:
                min_idx = j

        # Swap the found minimum element with the first element
        arr[i], arr[min_idx] = arr[min_idx], arr[i]

def print_list(arr):
    for i in arr:
        print(i, end=" ")
    print()

# Driver code to test the functions
if __name__ == "__main__":
    arr = [64, 34, 25, 12, 22, 11, 90]
    print("Original list is:")
    print_list(arr)

    selection_sort(arr)

    print("\nSorted list in ascending order is:")
    print_list(arr)
# Example Python code, source: https://www.sourcecodeexamples.net/2023/09/selection-sort-in-ascending-order-in-python.html

def selection_sort(arr):
    n = len(arr)

    # Traverse through all list elements
    for i in range(n):
        # Find the minimum element in the remaining unsorted list
        min_idx = i
        for j in range(i+1, n):
            if arr[j] < arr[min_idx]:
                min_idx = j

        # Swap the found minimum element with the first element
        arr[i], arr[min_idx] = arr[min_idx], arr[i]

def print_list(arr):
    for i in arr:
        print(i, end=" ")
    print()

# Driver code to test the functions
if __name__ == "__main__":
    arr = [64, 34, 25, 12, 22, 11, 90]
    print("Original list is:")
    print_list(arr)

    selection_sort(arr)

    print("\nSorted list in ascending order is:")
print_list(arr)<span class="token comment"># Example Python code, source: https://www.sourcecodeexamples.net/2023/09/selection-sort-in-ascending-order-in-python.html</span>
<span class="token keyword">def</span> <span class="token function">selection_sort</span><span class="token punctuation">(</span>arr<span class="token punctuation">)</span><span class="token punctuation">:</span>
n <span class="token operator">=</span> <span class="token builtin">len</span><span class="token punctuation">(</span>arr<span class="token punctuation">)</span>
<span class="token comment"># Traverse through all list elements</span>
<span class="token keyword">for</span> i <span class="token keyword">in</span> <span class="token builtin">range</span><span class="token punctuation">(</span>n<span class="token punctuation">)</span><span class="token punctuation">:</span>
<span class="token comment"># Find the minimum element in the remaining unsorted list</span>
min_idx <span class="token operator">=</span> i
<span class="token keyword">for</span> j <span class="token keyword">in</span> <span class="token builtin">range</span><span class="token punctuation">(</span>i<span class="token operator">+</span><span class="token number">1</span><span class="token punctuation">,</span> n<span class="token punctuation">)</span><span class="token punctuation">:</span>
<span class="token keyword">if</span> arr<span class="token punctuation">[</span>j<span class="token punctuation">]</span> <span class="token operator"><</span> arr<span class="token punctuation">[</span>min_idx<span class="token punctuation">]</span><span class="token punctuation">:</span>
min_idx <span class="token operator">=</span> j
<span class="token comment"># Swap the found minimum element with the first element</span>
arr<span class="token punctuation">[</span>i<span class="token punctuation">]</span><span class="token punctuation">,</span> arr<span class="token punctuation">[</span>min_idx<span class="token punctuation">]</span> <span class="token operator">=</span> arr<span class="token punctuation">[</span>min_idx<span class="token punctuation">]</span><span class="token punctuation">,</span> arr<span class="token punctuation">[</span>i<span class="token punctuation">]</span>
<span class="token keyword">def</span> <span class="token function">print_list</span><span class="token punctuation">(</span>arr<span class="token punctuation">)</span><span class="token punctuation">:</span>
<span class="token keyword">for</span> i <span class="token keyword">in</span> arr<span class="token punctuation">:</span>
<span class="token keyword">print</span><span class="token punctuation">(</span>i<span class="token punctuation">,</span> end<span class="token operator">=</span><span class="token string">" "</span><span class="token punctuation">)</span>
<span class="token keyword">print</span><span class="token punctuation">(</span><span class="token punctuation">)</span>
<span class="token comment"># Driver code to test the functions</span>
<span class="token keyword">if</span> __name__ <span class="token operator">==</span> <span class="token string">"__main__"</span><span class="token punctuation">:</span>
arr <span class="token operator">=</span> <span class="token punctuation">[</span><span class="token number">64</span><span class="token punctuation">,</span> <span class="token number">34</span><span class="token punctuation">,</span> <span class="token number">25</span><span class="token punctuation">,</span> <span class="token number">12</span><span class="token punctuation">,</span> <span class="token number">22</span><span class="token punctuation">,</span> <span class="token number">11</span><span class="token punctuation">,</span> <span class="token number">90</span><span class="token punctuation">]</span>
<span class="token keyword">print</span><span class="token punctuation">(</span><span class="token string">"Original list is:"</span><span class="token punctuation">)</span>
print_list<span class="token punctuation">(</span>arr<span class="token punctuation">)</span>
selection_sort<span class="token punctuation">(</span>arr<span class="token punctuation">)</span>
<span class="token keyword">print</span><span class="token punctuation">(</span><span class="token string">"\nSorted list in ascending order is:"</span><span class="token punctuation">)</span>
print_list<span class="token punctuation">(</span>arr<span class="token punctuation">)</span>Aside from line numbers and the border which is applied using CSS (which will be covered in a part 2 of this post series), you can clearly see that Shiki produces more legible and more accurate of the three options. I’m not sure why HLJS doesn’t highlight line numbers.
Bottom line, if you want your code boxes to look exactly like you’re used to seeing in Visual Studio Code, use Shiki. Rouge is (in my opinion) the worst of the three.
Call me a little bit biased, but, one thing I do love about Shiki is that it does not rely on any external stylesheet, or javascript code that you need to attach. The colors are all embedded in the HTML using thetag with embedded style attributes. Both Rogue and highlight.js need a stylesheet and/or JavaScript file to function, which might be a challenge for some.
# Step-by-Step Instructions
# Pre-requisite: Setup a Node.js (npm) environment in your Jekyll site
Shiki has a dependency on Node.js (a general-purpose JavaScript runtime environment) so you’ll have to make sure node and its package manager npm are installed before continuing.
Node.js is cross-platform and its installation should be fairly straight-forward as installers are available for macOS, Windows and Linux and you can typically install it through your preferred package manager: apt-get install nodejs (Debian/Ubuntu Linux) or brew install node (macOS/Linux Homebrew), yum install nodejs14 (CentOS/RedHat). Windows users, you’ll have to download and install the precompiled binary or install it through the Windows subsystem for Linux.
After it’s installed, make sure both npm and node are in your user’s $PATH, they can be called upon later.
Once Node and npm are installed, you can create a new Node project inside the root of your Jekyll site:
$ npm init -yThis will effectively create a package.json file and an empty node_modules/ directory at the root of your Jekyll site.
The contents of package.json are crucial because this is what instructs the future builds to pull in not only the dependency of Shiki, but Node as well into your Jekyll environment.
# 2. Install Shiki into your new Node.js environment using npm (required)
After you have successfully initalized a new Node project, use npm to install Shiki syntax highlighter:
$ npm install shikiShiki does have a decent amount of dependencies, so don’t be surprised if it takes a minute. It is also worth pointing out that this might also increase the time it takes to build your site. In my case, I don’t mind if it takes a little longer for better loking code boxes.
# 3. Create a Ruby plugin to register the {% shiki %} Liquid tag to trigger Shiki
Create a new file called shiki.rb inside the **_plugins** directory of your Jekyll site:
require "open3"

module Jekyll
  class ShikiHighlightBlock < Liquid::Block
    def initialize(tag_name, lang, tokens)
      super
      @lang = lang.strip
    end

    def render(context)
      code = super
      output = ""
      Open3.popen2("node", "shiki-highliter.js", @lang) do |stdin, stdout, wait_thr|
        stdin.write(code)
        stdin.close
        output = stdout.read
      end
      output
    end
  end
end

Liquid::Template.register_tag("shiki", Jekyll::ShikiHighlightBlock)
This plugin is responsible for executing Node, when you use the {% shiki %} Liquid tag in your site’s code or Markdown.
# 4. Create a JavaScript file which will instruct Node to call upon the Shiki highlighter
The location of this script should be in a path readable by the same user who is executing the build of your site. In my case, I have creatd a “scripts” directory inside the _plugins directory at the root of my site. Note that whichever path you choose, you will have to update the above Ruby plugin accordingly.
const shiki = require('shiki');
const fs = require('fs');

async function highlight() {
    const highlighter = await shiki.getHighlighter({
        theme: 'nord' // Change this to any theme Shiki supports
    });

    const code = fs.readFileSync(0, 'utf-8');
    const lang = process.argv[2] || 'plaintext';
    console.log(highlighter.codeToHtml(code, lang));
}

highlight();
This file should be placed in a path that is readable by whichever user or service is responsible for building your Jekyll site, like inside the **_plugins** directory, or you can optionally create a new directory **_scripts* just be prepared to update the paths as necessary.
# 5. Use the newly created highlighter
Because you have added a custom plugin you do not need to specify it in your site’s **_config.yml** but you will need to re-build your site.
Use the jekyll clean to clean up unnecesary cruft or temp file accumulation. This is sometimes necessasry when dealing with lots of custom plugins.
$ jekyll clean && bundle exec jekyll serveYou can now use the new Shiki syntax highlighter in your Markdown or your site’s _includes or _layout HTML files:
{% shiki javascript %}
      const message = "Hello, Shiki!";
      console.log(message);
    {% endshiki %}
Note: By integrating Shiki with Jekyll like this, it introdues Node.js as a dependency for building your site. Ensure that any environment where you’re building your site has access to both Jekyll and Node.js (and npm). You will also need to ensure that package.json is tracked in your source control and not excluded in the .gitignore file. This ensures thats Node will be included in future builds of your site on your respective hosting platform.
# Troubleshooting steps
Depending on your hosting platofmr, you may also create a .nvmrc file which will instruct your site’s build process to use the indicated version of Node.js. I had to do this with Cloudflare Pages.
14

Be the first to comment on this post!
Your personal data is secure.
Learn about how your information is collected, used, and securely stored in the Privacy Policy.